Image to Video Prompts How to Animate Photos Products Characters and Art in 2026
Image-to-video AI can transform a still photograph, product visual, character design, illustration, landscape, or artwork into a moving video.
However, uploading an image and writing “make this move” gives the model very little useful direction.
The image already defines what the scene looks like. It usually establishes the subject, composition, environment, lighting, colors, wardrobe, product design, and visual style.
Your prompt has a different responsibility.
It should explain what moves, how it moves, how the camera behaves, how quickly the shot develops, what should happen by the end, and which visual details must remain unchanged.
This guide contains reusable image-to-video prompts for portraits, products, characters, anime art, landscapes, fashion, food, social media, advertisements, and cinematic scenes.
You will also learn how to control camera movement, preserve faces and products, reduce visual drift, use start and end frames, and adapt prompts across different AI video generators.
Quick Answer
A strong image-to-video prompt focuses primarily on motion. Describe the subject movement, camera movement, environmental motion, timing, pacing, and ending state. Clearly state which elements must remain unchanged, including the face, product design, clothing, composition, background, lighting, colors, and visual style.
Key Takeaways
- Let the input image define the appearance of the scene.
- Use the text prompt to explain what changes over time.
- Separate subject motion, camera movement, and environmental motion.
- Use concrete physical actions instead of vague words such as “dynamic” or “cinematic.”
- Keep movement realistic for the duration of the generated clip.
- State what must remain unchanged when identity or product accuracy matters.
- Use a locked camera when only the subject or environment should move.
- Start with simple motion and add more direction only when needed.
- Review the result and refine one variable at a time.
- Save successful prompts as reusable templates for similar images.
Table of Contents
- What Are Image-to-Video Prompts?
- How Image-to-Video Generation Works
- Image-to-Video vs Text-to-Video Prompts
- Image-to-Video Prompt Structure
- How to Write Better Image-to-Video Prompts
- Image-to-Video Prompts for Portraits
- Image-to-Video Prompts for Products
- Image-to-Video Prompts for Characters
- Image-to-Video Prompts for Anime Art
- Image-to-Video Prompts for Landscapes
- Image-to-Video Prompts for Fashion
- Image-to-Video Prompts for Food and Beverages
- Image-to-Video Prompts for Social Media
- Image-to-Video Prompts for Advertisements
- Image-to-Video Prompts for Cinematic Scenes
- Camera Movement Prompts
- How to Keep Faces Consistent
- How to Keep Products and Logos Stable
- How to Reduce Warping Flicker and Background Drift
- First and Last Frame Prompting
- How to Adapt Prompts for Different Tools
- Weak vs Strong Image-to-Video Prompts
- Common Image-to-Video Prompt Mistakes
- How PrompTessor Helps With Image-to-Video Prompts
- FAQ About Image-to-Video Prompts
What Are Image-to-Video Prompts?
An image-to-video prompt is an instruction that tells an AI video model how a still image should move and develop over time.
The uploaded image normally acts as the starting visual reference.
It may already define:
- The main subject
- Facial appearance
- Body position
- Product design
- Clothing and accessories
- Background
- Composition
- Lighting
- Color palette
- Visual style
The prompt should therefore focus on information that is not visible in a still frame.
This includes:
- Subject movement
- Facial movement
- Camera movement
- Environmental motion
- Direction and speed
- Sequence of events
- Pacing
- Ending state
- Continuity requirements
Consider this basic prompt:
Make the woman move.
The model does not know whether the woman should walk, turn, blink, smile, speak, raise her hand, or remain still while the camera moves.
A more useful prompt could be:
The woman breathes naturally, blinks once, and slowly turns her gaze from the window toward the camera. A light breeze moves several loose strands of hair and the curtain behind her. The camera performs a very subtle slow push-in. Preserve her facial identity, clothing, pose, background layout, lighting direction, and color palette.
The second prompt gives clear temporal direction while allowing the image to remain the primary visual reference.
How Image-to-Video Generation Works
Image-to-video models use the uploaded image as the visual foundation for the generated sequence.
The model interprets visual relationships such as depth, subject position, lighting, materials, perspective, implied motion, and scene structure.
It then uses the text prompt to predict how those elements should move across a sequence of related frames.
The same image and prompt may still produce different results because generation can vary based on:
- The selected model
- The model version
- The clip duration
- The aspect ratio
- The strength of the visual reference
- The amount of implied motion in the input
- The requested camera movement
- The complexity of the action
- The generation seed or variation
The Image Is More Than a Visual Example
The input image often functions as the first frame or initial visual state.
If the image contains a person standing still, a parked car, or an unopened box, the video begins from that visible condition.
The prompt should describe what happens next.
Implied Motion Can Affect the Result
An image may already suggest a direction of movement.
Examples include:
- A runner leaning forward
- A car with motion blur behind it
- Dust rising from moving wheels
- Hair blowing strongly toward one side
- A character frozen in the middle of a jump
- Water captured during a splash
A prompt that contradicts those visual cues may require more iteration.
For example, asking a car with strong motion blur to remain completely motionless may be harder than starting with a clean image of a parked car.
Input Quality Matters
Problems in the source image can become more noticeable when animated.
Before generating, review the image for:
- Blurred faces
- Malformed hands
- Inconsistent product labels
- Distorted architecture
- Unclear object boundaries
- Low resolution
- Compression artifacts
- Unwanted motion blur
A clean starting image gives the model a more stable visual foundation.
Image-to-Video vs Text-to-Video Prompts
Text-to-video begins without a visual starting frame.
The prompt must therefore explain both the appearance of the scene and its motion.
Image-to-video already has a visual reference, so the prompt can spend more attention on movement and progression.
| Element | Text-to-Video | Image-to-Video |
|---|---|---|
| Subject appearance | Usually described in the prompt | Usually defined by the image |
| Environment | Usually described in the prompt | Usually defined by the image |
| Composition | Defined through prompt and settings | Primarily defined by the image |
| Lighting and colors | Usually described in the prompt | Primarily inherited from the image |
| Subject motion | Described in the prompt | Described in the prompt |
| Camera movement | Described in the prompt | Described in the prompt |
| Environmental motion | Described in the prompt | Described in the prompt |
| Continuity protection | Useful for generated subjects | Especially important |
For a broader guide covering both workflows, read AI Video Prompts How to Write Better Prompts for Any AI Video Generator in 2026.
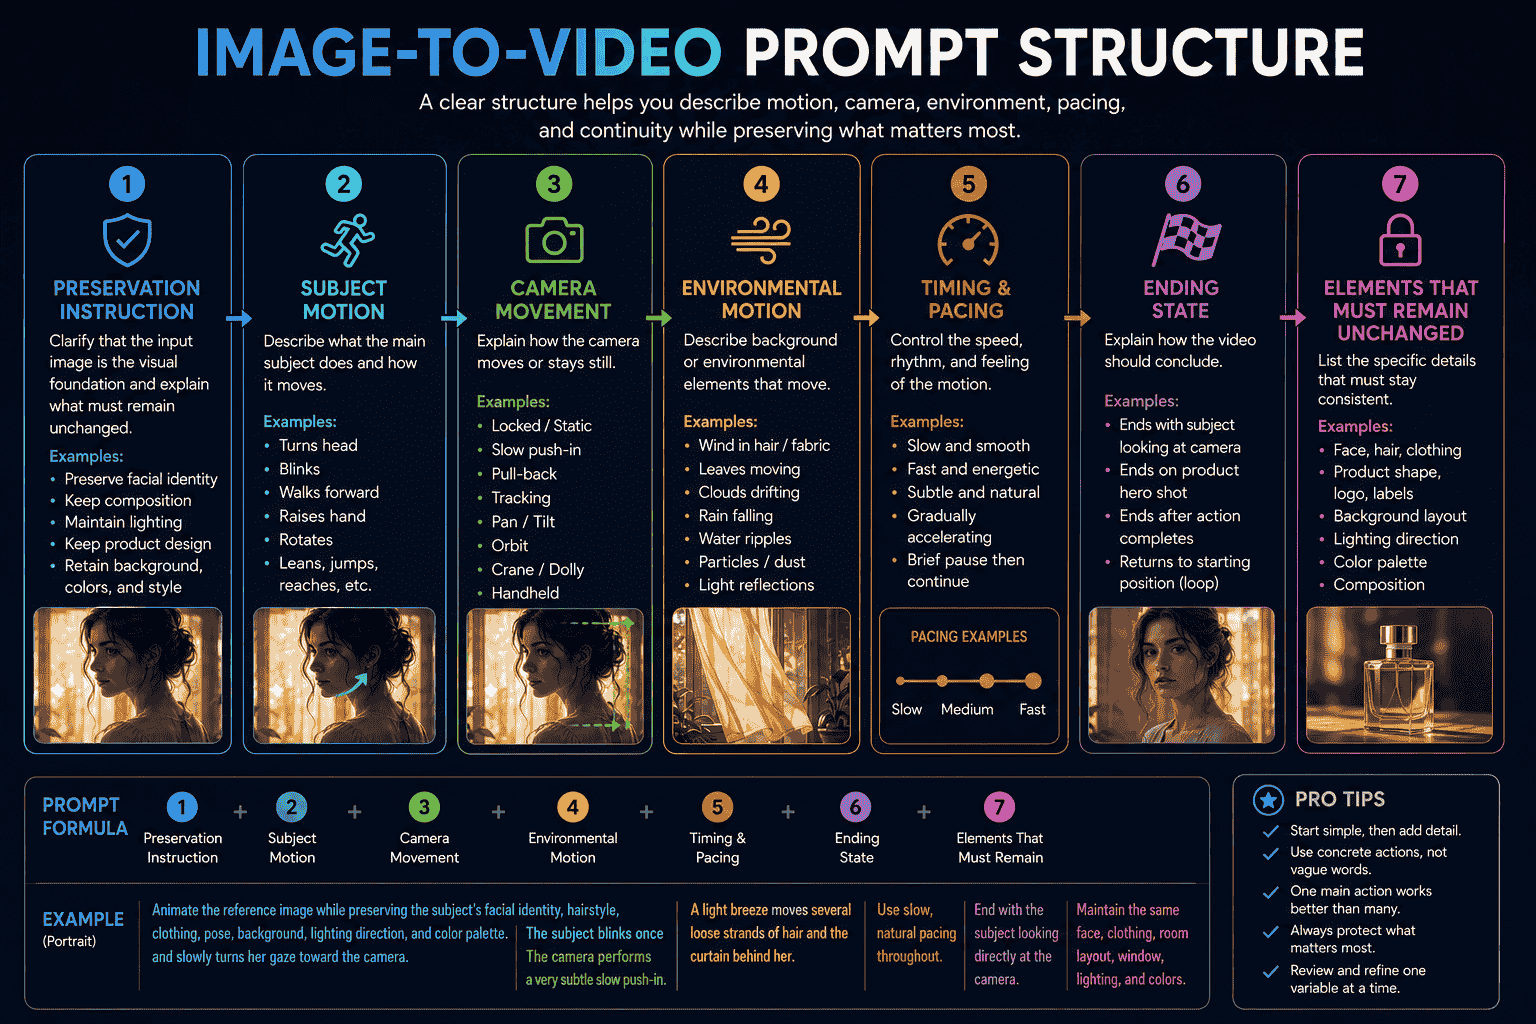
Image-to-Video Prompt Structure
A practical reusable structure is:
Animate the reference image. {subject_motion}. {camera_movement}. {environmental_motion}. {timing_and_pacing}. Preserve {unchanged_elements}. End with {final_state}.A more detailed version is:
Animate the reference image as a {video_style} shot. The {subject} {subject_action} at a {speed_and_motion_style}. The camera {camera_movement}. {environmental_elements} move {environmental_motion}. Use {pacing} pacing. Preserve {face_product_composition_lighting_and_style}. The shot ends with {ending_state}.1. Preservation Instruction
Start by clarifying that the image should remain the visual foundation.
Examples:
- Animate the reference image while preserving its visual design.
- Use the uploaded image as the exact starting composition.
- Keep the subject and environment visually consistent with the reference.
- Preserve the product design and studio composition.
2. Subject Motion
Subject motion describes what the main person, animal, object, vehicle, product, or character does.
Examples:
- The subject blinks once and turns her gaze toward the camera.
- The character slowly raises the sword.
- The car accelerates forward.
- The bottle rotates ten degrees to the right.
- The bird opens its wings and lifts into the air.
- The steam rises gradually from the cup.
Use observable physical actions rather than abstract concepts.
Instead of:
The character becomes confident.
Use:
The character straightens her posture, raises her head, and looks directly toward the camera.
3. Facial Motion
For portraits and characters, facial motion should normally be subtle.
Possible instructions include:
- Natural breathing
- One soft blink
- A slight smile
- A small change in gaze
- A subtle eyebrow movement
- A gradual turn of the head
Requesting several exaggerated expressions in a short clip can reduce identity consistency.
4. Camera Movement
Camera movement determines how the viewer’s perspective changes.
Examples:
- Locked camera
- Slow push-in
- Gentle pull-back
- Tracking movement
- Horizontal pan
- Vertical tilt
- Small orbit
- Crane upward
- Handheld movement
- Focus shift
Use one primary camera movement whenever possible.
5. Environmental Motion
Environmental motion adds life without changing the main composition.
Examples:
- Hair and fabric move gently in the wind.
- Leaves shift naturally in the background.
- Rain falls and creates ripples on the pavement.
- Mist drifts between the mountains.
- Steam rises from the drink.
- Light reflections move slowly across the product.
- Small particles float through the air.
- Clouds move gradually across the sky.
6. Timing and Pacing
Explain how quickly the motion should occur.
Examples:
- Slow and realistic movement
- One continuous smooth action
- Fast energetic pacing
- A brief pause before the final reveal
- Gradually accelerating movement
- Subtle motion throughout the clip
7. Ending State
Define how the video should conclude.
Examples:
- End with the subject looking directly at the camera.
- End with the complete product centered in frame.
- End after the character lowers the sword.
- End with the camera revealing the entire landscape.
- Return naturally to the starting position for a seamless loop.
8. Elements That Must Remain Unchanged
Continuity instructions may protect:
- Facial identity
- Hairstyle
- Wardrobe
- Body proportions
- Product dimensions
- Logo placement
- Packaging text
- Background layout
- Object positions
- Lighting direction
- Color palette
- Visual style
How to Write Better Image-to-Video Prompts
Step 1 Inspect the Input Image
Before writing the prompt, identify what the image already provides.
Ask:
- Who or what is the main subject?
- What direction is the subject facing?
- Does the pose imply movement?
- Where is the camera positioned?
- What elements could move naturally?
- Which details must remain stable?
- Are there visual artifacts that may become worse?
Step 2 Choose One Main Motion
Start with the most important movement.
Examples:
- The subject turns toward the camera.
- The product rotates slowly.
- The character raises a weapon.
- The camera moves through the landscape.
- The ingredients fall into the cup.
A short clip usually works better with one clear primary action than several unrelated events.
Step 3 Decide Whether the Camera Should Move
The camera does not always need to move.
Use a locked camera when:
- Facial stability is important
- The product must remain perfectly framed
- The movement should come only from the environment
- You want a seamless loop
- The input image already has a strong composition
Add camera movement when it supports the reveal, scale, or emotion of the shot.
Step 4 Add Supporting Environmental Motion
Choose one or two elements that can move naturally.
For a portrait, this may be hair and curtains.
For a landscape, this may be clouds and mist.
For a product, this may be light reflections and particles.
Step 5 Set the Speed
Explain whether the movement should feel:
- Subtle
- Slow
- Smooth
- Energetic
- Sudden
- Rhythmic
- Gradually accelerating
Step 6 Protect Important Details
Add a short preservation block when consistency matters.
Preserve:
- Facial identity
- Hairstyle
- Clothing
- Background composition
- Lighting direction
- Color palette
Step 7 Define the Ending
The final state helps give the motion a destination.
For example:
End with the subject facing the camera while the background movement gradually stops.
Step 8 Generate the First Version
Do not try to perfect every detail before testing.
The first generation helps reveal:
- Whether the image supports the requested movement
- Whether the camera motion is too strong
- Whether the face or product remains stable
- Whether the action fits the duration
- Whether the environmental motion feels natural
Step 9 Refine One Variable at a Time
Possible refinements include:
- Make the head turn smaller.
- Reduce the orbit to ten degrees.
- Keep the camera fully locked.
- Slow down the product rotation.
- Remove the background movement.
- Preserve the lighting direction.
- End the movement earlier.
Changing one variable at a time makes the workflow easier to understand.
Image-to-Video Prompts for Portraits
1. Natural Portrait Animation
Animate the reference portrait. The subject breathes naturally, blinks once, and makes a small gradual turn toward the camera. Several loose strands of hair move gently in the air. The camera performs a very subtle slow push-in. Preserve the subject’s facial identity, skin texture, hairstyle, clothing, pose, background, lighting, and color palette. Calm and realistic movement.2. Looking Out of a Window
Animate the reference image. The subject begins looking through the window, then slowly shifts her gaze toward something outside the frame. The curtain moves gently and soft light changes slightly across her face as clouds pass outside. Keep the camera locked. Preserve her face, hairstyle, clothing, room layout, window position, and lighting direction. Quiet contemplative pacing.3. Subtle Smile
Animate the portrait with minimal natural motion. The subject blinks once, takes a quiet breath, and gradually develops a small relaxed smile. The camera remains completely still. Preserve facial proportions, eye color, hairstyle, clothing, background, and photographic style. Avoid exaggerated expression or large head movement.4. Editorial Fashion Portrait
Animate the editorial portrait. The subject slowly turns her head to the left while maintaining a confident expression. Wind moves her hair and the outer layer of her clothing. The camera performs a slow five-degree orbit to the right. Preserve facial identity, makeup, wardrobe design, jewelry, body position, backdrop, and color grading. Premium restrained pacing.Image-to-Video Prompts for Products
5. Luxury Product Reveal
Animate the reference product image as a premium advertisement. A narrow highlight moves slowly across the product from left to right, revealing its material and surface texture. The camera performs a smooth ten-degree orbit to the right while keeping the product centered. Fine particles drift subtly behind it. Preserve the exact product shape, dimensions, packaging, logo placement, label, colors, pedestal, and background composition. End with a clean centered hero shot.6. Skincare Bottle Animation
Animate the reference skincare product image. Small water droplets move slowly down the glass bottle while a soft band of light passes across its surface. The camera performs a gentle push-in without changing the viewing angle. Preserve the bottle shape, cap, liquid level, label, logo, typography, reflections, surface, and background. Slow clean commercial pacing.7. Technology Product Animation
Animate the reference technology product image. A thin interface light activates along the edge of the device, followed by a subtle screen glow. The camera slides slowly from left to right while maintaining the same distance and perspective. Preserve every button, port, screen proportion, material, logo, and product dimension. End with the complete device clearly visible.8. Product Rotation
Animate the reference image with a controlled product rotation. The product rotates slowly fifteen degrees clockwise and then stops. The camera remains locked. Reflections move naturally across the surface as the product turns. Preserve the product design, branding, label text, packaging proportions, studio background, shadow direction, and lighting quality.Image-to-Video Prompts for Characters
9. Character Introduction
Animate the character reference. The character breathes naturally, raises their head, and slowly shifts into a confident standing posture. Clothing and hair move gently in the wind. The camera performs a slow pull-back from a medium shot to a full-body view. Preserve the character’s face, hairstyle, costume, body proportions, weapon, accessories, environment, and lighting direction.10. Fantasy Warrior
Animate the fantasy character image. The warrior takes one deliberate step forward, tightens their grip on the weapon, and lowers into a defensive stance. Dust moves across the ground and layered fabric reacts to the wind. The camera performs a subtle low-angle push-in. Preserve facial identity, armor design, weapon shape, costume colors, body proportions, background architecture, and sunset lighting.11. Science-Fiction Character
Animate the science-fiction character reference. Small interface lights activate across the suit while the character turns their head toward an off-screen signal. The camera tracks slowly to the left. Steam escapes briefly from a nearby machine and background warning lights pulse softly. Preserve the face, suit design, equipment placement, environment, color palette, and scale.12. Mascot Animation
Animate the mascot reference. The mascot blinks, raises one hand, and gives a short friendly wave. The body makes a small natural bounce before returning to the original pose. Keep the camera locked and the background simple. Preserve the character design, colors, proportions, facial features, accessories, and visual style. Create a seamless loop.Image-to-Video Prompts for Anime Art
13. Anime Portrait Animation
Animate the anime portrait. The character blinks once and slowly turns her gaze toward the glowing light on the right. Hair strands and ribbon details move gently in the wind. Small luminous particles rise through the scene. The camera performs a subtle slow push-in. Preserve facial design, eye shape, hairstyle, clothing, linework, colors, and background composition.14. Anime Sword Scene
Animate the anime character image. The character slowly raises the sword into a ready position while the blade begins emitting a soft blue glow. Hair and layered fabric move toward the left in the wind. The camera performs a controlled low-angle orbit of ten degrees. Preserve the character’s face, costume, sword design, body proportions, environment, and anime rendering style.15. Magical Energy Scene
Animate the reference artwork. Purple energy pulses gradually through the magical structure while small sparks and particles rise upward. The character remains mostly still with natural breathing and subtle hair movement. The camera performs a very slow push-in. Preserve the character’s appearance, pose, clothing, weapon, environment, lighting direction, and composition.16. Anime Landscape Loop
Animate the anime landscape. Clouds move slowly across the sky, grass and flowers respond gently to the wind, and reflections shift across the water. Keep the camera completely locked. Preserve the landscape layout, buildings, color palette, lighting, linework, and visual style. Create a seamless calming loop.Image-to-Video Prompts for Landscapes
17. Mountain Landscape
Animate the reference landscape. Mist drifts slowly between the mountain layers, clouds move gradually across the sky, and sunlight creates changing highlights across the valley. The camera performs a gentle forward glide along the visible path. Preserve the terrain, buildings, vegetation, composition, lighting direction, and realistic visual style.18. Forest Scene
Animate the forest image. Leaves and branches move gently in the wind while narrow beams of sunlight shift through the canopy. Small particles float through the air and mist moves slowly between the trees. The camera performs a subtle forward push. Preserve the tree positions, path, color palette, lighting, and atmosphere.19. Ocean Scene
Animate the coastal image. Waves move naturally toward the shore, foam spreads across the sand, and clouds drift slowly above the horizon. The camera remains locked while sunlight reflections move across the water. Preserve the coastline, rocks, buildings, horizon, colors, and composition.20. City Landscape
Animate the city reference. Traffic moves slowly along the roads, windows and signs illuminate gradually, and clouds drift across the evening sky. The camera performs a controlled slow push-in toward the city center. Preserve the architecture, road layout, skyline, perspective, lighting direction, and color grade.Image-to-Video Prompts for Fashion
21. Editorial Fashion Pose
Animate the editorial fashion image. The model slowly turns her shoulders toward the camera while keeping a composed expression. Wind moves the outer fabric and several strands of hair. The camera performs a subtle horizontal slide to the right. Preserve facial identity, makeup, hairstyle, outfit design, jewelry, body proportions, background, and editorial color grading.22. Fabric Movement
Animate the reference image with emphasis on the clothing. The model remains mostly still while the long fabric moves gracefully in a controlled breeze. The camera performs a slow pull-back to reveal the full silhouette. Preserve the model’s face, pose, garment construction, material texture, colors, background, and lighting.23. Runway-Style Motion
Animate the fashion reference. The model takes two slow controlled steps toward the camera and briefly adjusts the sleeve. The camera tracks backward at the same speed and maintains stable framing. Preserve the model’s identity, outfit, proportions, runway environment, lighting, and color palette. Elegant realistic pacing.Image-to-Video Prompts for Food and Beverages
24. Hot Beverage Animation
Animate the reference drink image. Steam rises naturally from the cup and curls slowly toward the left. A small reflection moves across the surface of the drink while the camera performs a gentle macro push-in. Preserve the cup, logo, drink color, table surface, background, lighting, and composition.25. Beverage Pour
Animate the reference product image. Liquid pours smoothly into the glass from above, creating realistic bubbles and a controlled splash. The camera remains locked. Preserve the bottle and glass design, product color, label, logo, background, and lighting. End when the glass reaches the intended fill level.26. Food Hero Shot
Animate the food image with subtle appetizing motion. Steam rises from the dish, sauce moves slowly across the surface, and small herbs settle naturally onto the food. The camera performs a slow three-degree orbit. Preserve the dish shape, ingredients, plate, table arrangement, lighting, colors, and commercial photography style.27. Ingredient Motion
Animate the reference image. Several visible ingredients fall gradually into the bowl while small crumbs and particles respond naturally. The camera remains in the same top-down position. Preserve the bowl, ingredient colors, surface, arrangement, lighting, and framing.Image-to-Video Prompts for Social Media
28. Vertical Portrait Reel
Animate the vertical portrait for a social media reel. The subject turns slightly toward the camera, smiles naturally, and makes one small hand gesture. The camera performs a subtle push-in. Background lights move softly and hair responds gently to the air. Preserve facial identity, clothing, composition, colors, and vertical framing.29. Product Social Video
Animate the reference product visual for a vertical social media post. The product rises slightly from the surface while a controlled highlight moves across it. The camera performs a quick but smooth push-in, followed by a short pause on the hero frame. Preserve the product design, logo, label, brand colors, background, and negative space for text overlays.30. Seamless Social Loop
Create a seamless loop from the reference image. The main visual element moves slowly forward, reaches a brief peak position, and returns naturally to the starting state. Supporting particles move continuously in the background. Keep the camera locked and preserve the composition, colors, lighting, and visual style.31. Educational Graphic Animation
Animate the reference infographic without changing its layout. Icons appear with small sequential movements, connecting lines illuminate from left to right, and supporting shapes move subtly in the background. Keep all text, labels, colors, spacing, and hierarchy unchanged. Use clean moderate pacing and a locked camera.Image-to-Video Prompts for Advertisements
32. Premium Product Advertisement
Animate the reference advertisement as a premium product film. Begin with the product motionless while the background light gradually increases. A controlled highlight travels across the product and the camera performs a slow push-in. Small particles move subtly around the scene. Preserve the product, packaging, branding, typography, background, and campaign color palette. End on a clean hero frame.33. Lifestyle Advertisement
Animate the lifestyle product image. The person uses the product with one simple natural action while the camera follows with a smooth subtle movement. Background activity remains restrained and realistic. Preserve the person’s face, clothing, product design, environment, lighting, and composition. End with the product clearly visible.34. Transformation Advertisement
Animate the reference image with a controlled visual transformation. The original environment gradually changes from {starting_state} into {final_state} while the subject remains visually consistent and in the same position. The camera performs a slow pull-back during the transformation. Preserve the subject, product, logo, proportions, and overall framing.Image-to-Video Prompts for Cinematic Scenes
35. Cinematic Character Moment
Animate the cinematic reference image. The character takes a slow breath, turns toward the distant light, and tightens their grip on the object in their hand. The camera performs a restrained handheld push-in. Wind moves clothing and dust across the environment. Preserve facial identity, costume, props, environment, lighting direction, and cinematic color grade.36. Suspense Scene
Animate the reference scene with slow suspenseful pacing. The character remains still at first, then gradually turns toward an unseen sound behind them. A hanging light flickers and a door in the background moves slightly. The camera performs a very slow push-in. Preserve the character’s identity, clothing, room layout, object positions, and low-light atmosphere.37. Vehicle Scene
Animate the vehicle reference. The vehicle accelerates forward while the camera tracks alongside at the same speed. Dust, water, or road particles react naturally behind the wheels. Reflections move across the body. Preserve the vehicle model, proportions, wheels, lights, paint, branding, environment, and direction of travel.38. Cinematic Reveal
Animate the reference image with a pull-back reveal. Begin close to {foreground_detail}. The camera slowly moves backward and upward, gradually revealing {main_subject_and_environment}. Environmental motion remains subtle and realistic. Preserve the original visual style, architecture, subject appearance, lighting, colors, and spatial relationships.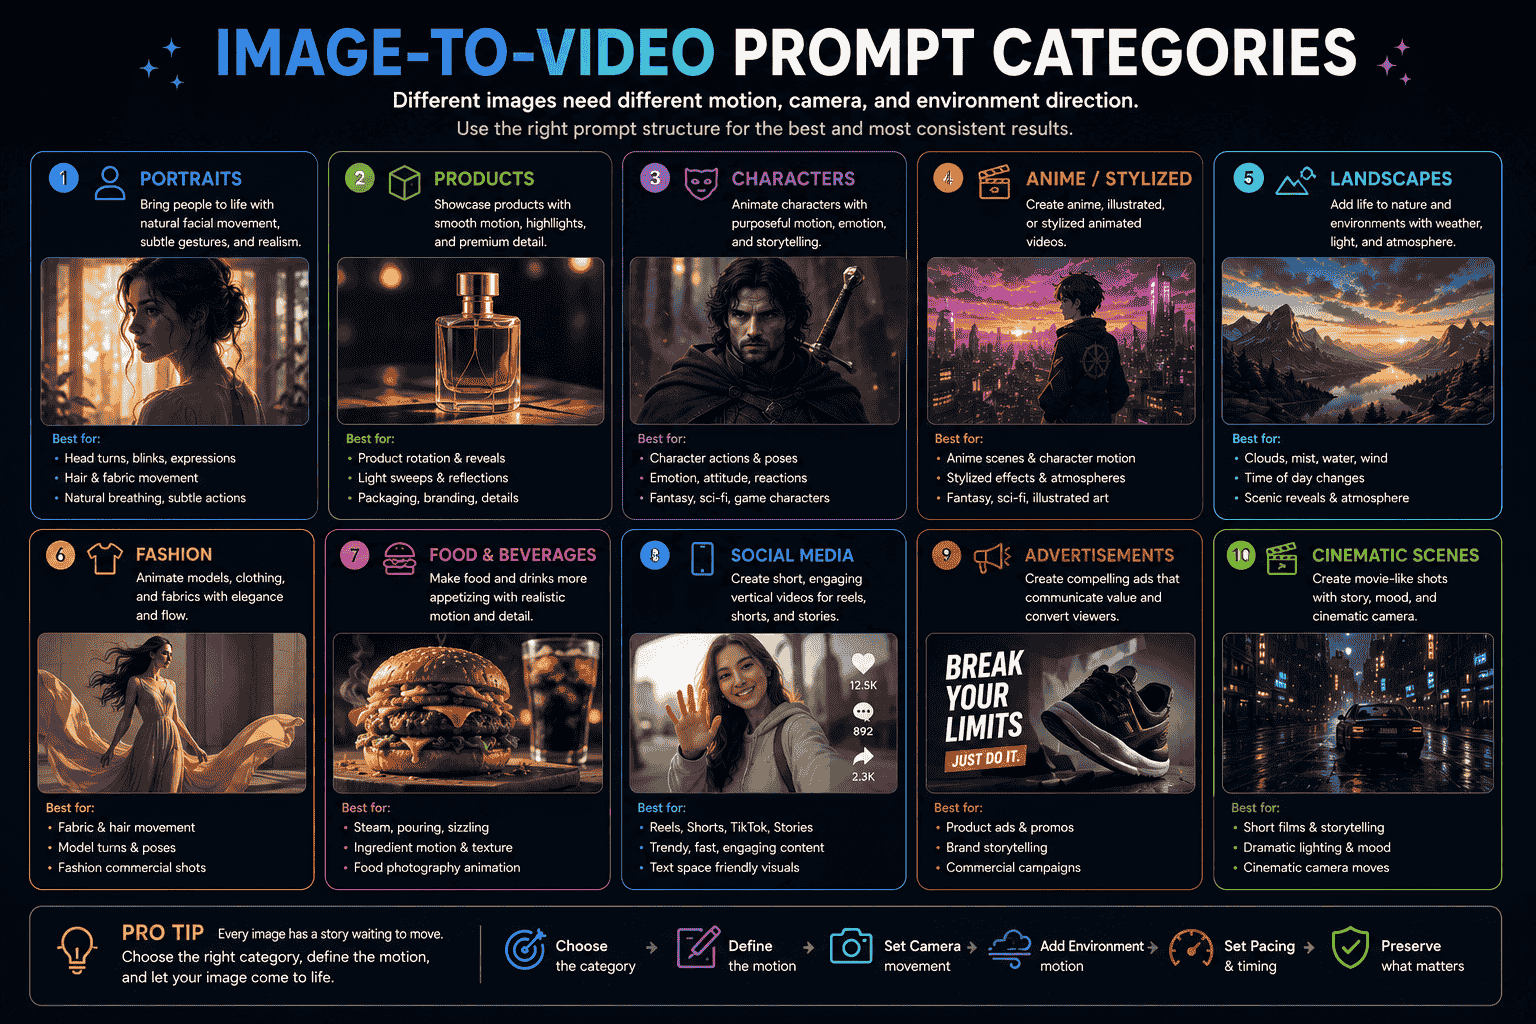
Camera Movement Prompts for Image-to-Video
Locked Camera
The camera remains completely locked and motionless throughout the clip. Only {subject_or_environment} moves.Slow Push-In
The camera performs a very slow smooth push-in toward {subject}, maintaining the original angle and centered composition.Gentle Pull-Back
The camera slowly pulls backward from the subject, revealing more of the existing environment without changing the visual style.Small Orbit
The camera performs a smooth ten-degree orbit to the right while keeping the subject centered and preserving its proportions.Horizontal Tracking
The camera tracks horizontally alongside the moving subject while maintaining a consistent distance and stable framing.Vertical Crane Movement
The camera rises gradually from the foreground and reveals more of the background while preserving the original composition and perspective.Handheld Movement
The camera uses restrained natural handheld movement with subtle realistic shake, without changing the framing significantly.Focus Shift
The camera remains still while focus gradually shifts from {foreground_element} to {background_element}.Macro Slide
The camera slides slowly across the product surface in a macro close-up, revealing texture and material detail.Push-In and Pause
The camera slowly pushes toward the subject, then stops and holds the final composition for the last moment of the clip.How to Keep Faces Consistent
Large facial changes can make the subject look like a different person.
Use Subtle Facial Motion
Begin with small movements such as:
- Natural breathing
- One blink
- A slight smile
- A small gaze shift
- A gradual head turn
Avoid Combining Too Many Expressions
A prompt that asks the subject to laugh, become surprised, look angry, turn around, and speak may create instability.
Choose one primary expression change.
Limit Large Camera Changes
Strong orbits and dramatic changes in perspective may force the model to invent facial information that is not visible in the original image.
Use a locked camera or subtle push-in when facial identity is the priority.
Include an Identity Preservation Block
Preserve:
- Exact facial identity
- Facial proportions
- Eye shape and color
- Nose and mouth structure
- Skin tone and texture
- Hairstyle
- Age and recognizable characteristics
Use a Suitable Source Image
A clear, well-lit image with a visible face generally provides a stronger reference than a blurred or heavily obscured portrait.
How to Keep Products and Logos Stable
Minimize Product Deformation
Use simple controlled motion, such as a small rotation, light sweep, or camera slide.
Avoid extreme transformations when product accuracy matters.
Protect the Product Geometry
Preserve:
- Exact product shape
- Dimensions and proportions
- Packaging construction
- Cap, buttons, ports, and edges
- Material appearance
- Label position
- Logo placement
- Typography and colors
Move the Camera Instead of the Product
When the product design must remain exact, a moving camera around a stationary product may be safer than rotating or transforming the product itself.
Keep Branding Visible
Explain which side of the product should face the camera and when the logo should remain visible.
Example:
Keep the front label facing the camera throughout the shot while the camera slides slowly to the right.
Review Typography Carefully
Generated video may alter small packaging text between frames.
For commercial work, inspect every important label and consider replacing or stabilizing typography during editing.
How to Reduce Warping Flicker and Background Drift
Reduce the Number of Moving Elements
Begin with one primary motion and one supporting environmental motion.
Use a Locked Camera
A stable camera can reduce changes in geometry and background layout.
Use Positive Direct Instructions
Describe the desired stable behavior.
Instead of:
Do not move the camera.
Use:
Locked camera. The camera remains completely still.
Avoid Conflicting Movement
Do not ask the camera to move left while the subject moves right and the background rotates unless that complexity is intentional.
Preserve Spatial Relationships
Explain which objects should remain in the same positions.
Keep the table, chair, window, product, and background objects in their original positions throughout the clip.Shorten the Motion
A smaller head turn, shorter camera orbit, or slower transformation may produce more stable results.
Remove Source Artifacts
Correct distorted hands, labels, edges, and background objects before animating the image.
Generate Individual Shots
For complex sequences, generate separate clips and edit them together instead of requesting several camera angles from one image.
First and Last Frame Prompting
Some AI video tools allow you to provide both a starting image and an ending image.
The starting frame defines where the motion begins, while the ending frame gives the model a destination.
When to Use Start and End Frames
- Product transformations
- Before-and-after visuals
- Character pose transitions
- Camera reveals
- Environmental changes
- Logo or object assembly
- Controlled opening and closing frames
Start and End Frame Prompt Structure
Begin exactly from the first reference frame and transition smoothly toward the final reference frame. {describe_the_motion_between_frames}. Maintain {continuity_requirements}. Use {pacing} pacing and preserve the visual style throughout.Example Product Transformation
Begin exactly from the first product frame and transition smoothly toward the final illuminated product frame. The outer packaging opens gradually, the product rises into view, and the internal light activates from bottom to top. The camera remains locked. Preserve the product design, logo, materials, colors, perspective, and studio environment. Use slow premium pacing.Example Character Transition
Begin from the first character pose and transition naturally toward the final pose. The character raises the sword, turns the upper body, and steps into the final defensive stance. Clothing and hair respond naturally to the movement. Preserve the character’s face, costume, body proportions, weapon, environment, and lighting.Do Not Overdescribe the Destination
The final image already provides visual information about the ending.
Use the prompt to explain the motion between both states rather than repeating every detail visible in the final frame.
How to Adapt Prompts for Different AI Video Generators
Image-to-video principles can transfer across tools, but the available controls and model behavior may differ.
Runway
Use the image as the visual foundation and focus the text prompt mainly on motion.
A simple structure is:
The camera {camera_motion} as the subject {subject_action}. {environmental_motion_and_timing}.Start with the essential motion and add further details only when the output needs more control.
Use positive descriptions such as “locked camera” rather than negative instructions about what should not happen.
Review the official Runway Image-to-Video Prompting Guide for current recommendations.
Veo
Describe the subject movement, framing, camera behavior, lighting, atmosphere, and visual pacing clearly.
When the reference already defines the character and setting, avoid replacing those details with conflicting descriptions.
Example:
The character slowly raises her gaze toward the glowing doorway. The camera performs a subtle push-in while dust particles move through the warm light. Preserve her appearance, clothing, pose, environment, and lighting direction.Review the official Veo prompt guide for current examples and workflows.
Adobe Firefly
Use the prompt to describe the subject motion, camera movement, shot direction, lighting, mood, and visual progression.
You can also combine prompt direction with available camera controls or supported start and end frame workflows.
Example:
The product remains stationary while a soft highlight moves across the surface. The camera slowly zooms toward the front label. Preserve the product geometry, logo, packaging text, background, and lighting.Review Adobe’s image-to-video prompting guide for current examples.
Seedance
For multimodal workflows, clearly state the purpose of every reference.
Example:
Use image 1 as the character and wardrobe reference. Use image 2 as the environment reference. Animate the character walking slowly through the environment while the camera follows from behind. Preserve the same face, clothing, environment, lighting, and visual style.When audio or video references are also used, explain whether they control timing, camera motion, movement, or sound.
Other AI Video Tools
Begin with the same universal principles:
- Use the input image as the visual reference.
- Describe the main subject motion.
- Choose one camera movement.
- Add limited environmental motion.
- Define the pacing.
- Protect important visual details.
- Explain the ending state.
Then use the tool interface for duration, aspect ratio, resolution, motion strength, or reference controls.
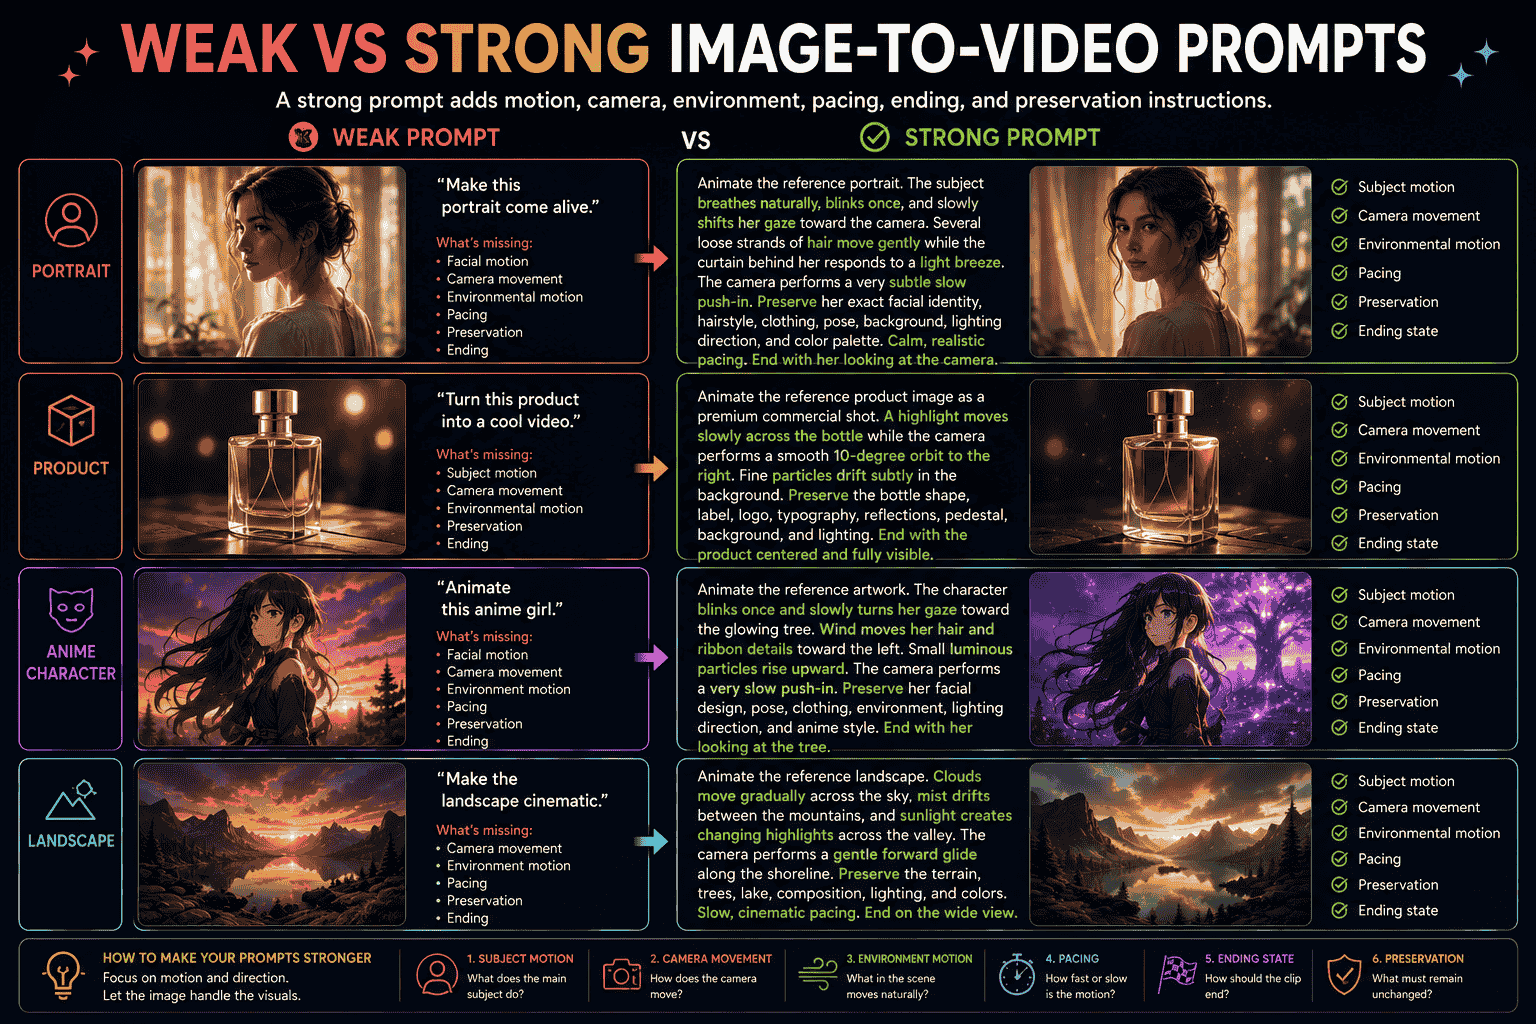
Weak vs Strong Image-to-Video Prompts
Example 1 Portrait
Weak prompt:
Make this portrait come alive.
What is missing:
- Facial motion
- Head movement
- Camera behavior
- Environmental motion
- Pacing
- Identity preservation
Stronger prompt:
Animate the reference portrait. The subject breathes naturally, blinks once, and slowly shifts her gaze toward the camera. Several loose strands of hair move gently while the curtain behind her responds to a light breeze. The camera performs a very subtle slow push-in. Preserve her exact facial identity, hairstyle, clothing, pose, background, lighting direction, and color palette.
Example 2 Product
Weak prompt:
Turn this product into a cool video.
Stronger prompt:
Animate the reference product image as a premium commercial shot. A controlled highlight moves slowly across the glass bottle while the camera performs a smooth ten-degree orbit to the right. Fine mist drifts subtly in the background. Preserve the bottle shape, cap, liquid level, label, logo, typography, pedestal, background, and lighting. End with the product centered and fully visible.
Example 3 Anime Character
Weak prompt:
Animate this anime girl.
Stronger prompt:
Animate the reference artwork. The character blinks once and slowly turns her gaze toward the glowing tree. Wind moves her long hair and layered dress toward the left. Purple energy pulses gradually through the branches while small particles rise upward. The camera performs a very slow push-in. Preserve her facial design, pose, clothing, weapon, environment, composition, and lighting direction.
Example 4 Landscape
Weak prompt:
Make the landscape cinematic.
Stronger prompt:
Animate the reference landscape. Mist drifts slowly between the mountain layers, clouds move gradually across the sky, and sunlight creates changing highlights across the valley. The camera performs a gentle forward glide along the path in the foreground. Preserve the terrain, buildings, vegetation, composition, lighting, colors, and realistic visual style.
Common Image-to-Video Prompt Mistakes
1. Repeating the Entire Image Description
The model already has the image.
Focus on motion unless a visible detail needs to be protected or changed.
2. Writing Only “Make It Move”
Specify who or what moves, in which direction, at what speed, and how the shot ends.
3. Requesting Too Many Actions
A short video may not have enough time for several unrelated movements.
4. Using Vague Motion Language
Replace “move dynamically” with physical instructions such as “turns toward the camera and raises one hand.”
5. Adding Too Many Camera Movements
Choose one primary camera movement whenever possible.
6. Ignoring Implied Motion
Check whether the image already contains motion blur, a directional pose, dust, wind, or another visual cue.
7. Not Protecting Facial Identity
Add explicit preservation instructions when the person must remain recognizable.
8. Not Protecting Product Design
State that shape, proportions, branding, labels, materials, and colors must remain unchanged.
9. Using Negative Instructions Only
Describe the desired stable behavior positively.
Use “locked camera” rather than only “no camera movement.”
10. Ignoring the Duration
Make sure the requested action can occur naturally within the selected clip length.
11. Leaving the Ending Undefined
An ending state gives the motion a clearer destination.
12. Changing Everything During Refinement
Change one important variable at a time.
13. Using a Low-Quality Starting Image
Blur, distorted details, and compression artifacts may become more visible during animation.
14. Expecting Perfect Typography Stability
Inspect labels, logos, posters, screens, and packaging text across the entire clip.
How PrompTessor Helps With Image-to-Video Prompts
PrompTessor helps users generate, analyze, optimize, refine, reverse-engineer, save, and reuse prompts for visual and motion-based AI workflows.
You can begin with a rough instruction such as:
Animate this product image.
Prompt Generator can help turn the idea into a structured image-to-video prompt containing:
- Subject motion
- Camera movement
- Environmental motion
- Direction and speed
- Pacing
- Ending state
- Continuity requirements
Prompt Analysis can help identify missing information such as:
- Undefined movement
- No camera direction
- Missing pacing
- No preservation instruction
- Too many actions
- No ending state
- Conflicting motion
Prompt Optimizer can make the direction clearer, more specific, and easier for a video model to interpret.
Prompt Refinement can apply targeted feedback such as:
- Keep the camera locked
- Make the motion more realistic
- Reduce the head movement
- Preserve the product logo
- Create a seamless loop
- Adapt the prompt for a vertical video
- Turn the prompt into a reusable template
PrompTessor also includes Video to Prompt, which starts from an existing video rather than a still image.
Video to Prompt can analyze reusable elements such as scene progression, subject movement, camera behavior, timing, pacing, transitions, lighting, visual style, and continuity.
The difference is:
- Image-to-video prompting starts from a still image and defines how it should move.
- Video to Prompt starts from an existing video and reconstructs its motion and scene direction as a reusable prompt.
Once an image-to-video prompt works well, it can be saved in the Prompt Library and reused for similar portraits, products, characters, advertisements, or cinematic scenes.
FAQ About Image-to-Video Prompts
What is an image-to-video prompt?
An image-to-video prompt is an instruction describing how a still image should move and develop over time. It may define subject motion, camera movement, environmental motion, pacing, ending state, and continuity requirements.
What should I include in an image-to-video prompt?
Include the main subject motion, camera movement, environmental motion, direction, speed, pacing, ending state, and the elements that must remain unchanged.
Should I describe the entire image again?
Usually not. The uploaded image already defines the subject, environment, composition, lighting, and style. Repeat visual details only when they need to remain consistent or should be changed.
What is the difference between image-to-video and text-to-video prompts?
Text-to-video prompts normally describe both the visual scene and its motion. Image-to-video prompts begin with a visual reference and therefore focus more heavily on movement, timing, camera behavior, and continuity.
How do I animate a portrait without changing the face?
Use subtle facial movement, limit large head turns and camera orbits, start with a clear portrait, and explicitly preserve facial identity, proportions, hairstyle, skin tone, and recognizable details.
How do I keep a product stable in an AI video?
Use simple controlled movement, preserve the product geometry and branding, keep important labels visible, and consider moving the camera around a stationary product instead of rotating the product itself.
What camera movement works best for image-to-video?
The best movement depends on the image. Common options include a locked camera, slow push-in, gentle pull-back, small orbit, tracking movement, horizontal slide, and focus shift.
Can I create a seamless loop from one image?
Yes. Describe a motion that returns naturally to the starting state, keep the camera locked, and preserve the composition, lighting, and object positions.
Why does the background change during image-to-video generation?
Background drift can occur when the model must invent new perspectives or process too many moving elements. Smaller camera movements, clearer preservation instructions, and a cleaner source image may improve stability.
Can I use a first and last frame?
Some AI video tools support both a starting image and an ending image. The prompt should describe how the scene moves between the two states while preserving important visual details.
Can the same prompt work with every AI video generator?
The same core structure can provide a useful starting point, but motion controls, references, duration, aspect ratio, and model behavior differ between tools.
Can PrompTessor create image-to-video prompts?
PrompTessor helps users generate, analyze, optimize, refine, save, and reuse prompts that describe subject motion, camera movement, pacing, continuity, and other image-to-video requirements.
Turn Still Images Into Better AI Videos
A successful image-to-video prompt does not need to redescribe every detail in the source image.
It needs to explain what happens next.
Define the main motion, choose the camera behavior, add limited environmental movement, set the pacing, and state what must remain visually consistent.
Start with simple motion.
Generate the first version, review the result, and refine one important variable at a time.
When a prompt works well, turn it into a reusable template for similar portraits, products, characters, landscapes, advertisements, or social media visuals.
The image defines what the scene looks like. The prompt directs how that scene comes alive.
Build better prompts in one workspace
Generate prompts from ideas, analyze and optimize quality, refine with feedback, reverse-engineer content, and save reusable prompts in your Prompt Library.
Try PrompTessor Free