Best Vibe Coding Prompts for Building Apps From Idea to Launch in 2026
Vibe coding can turn a simple product idea into a working application faster than traditional development workflows.
You describe what you want, an AI coding agent creates the project, and within minutes you may have a landing page, dashboard, database schema, or basic user workflow.
But generating the first version is usually the easy part.
Problems often begin when the application grows beyond the initial prototype. The AI may add features that do not match the product, modify unrelated files, duplicate existing logic, ignore important edge cases, or create an interface that looks complete while still relying on placeholder functionality.
A request such as:
Build a project management SaaS app.
does not explain who the product is for, which problem it solves, what the minimum viable product should include, what should remain outside the scope, or how the result should be verified.
Effective vibe coding therefore requires more than one large prompt that asks an AI to build an entire application.
It works best as a structured sequence:
Idea → Product plan → MVP scope → User workflow → Architecture → Milestones → Build → Refine → Verify → Launch
This guide provides reusable vibe coding prompts for every stage of that workflow, from turning an idea into a product brief to reviewing an AI-generated codebase and preparing the application for launch.
Quick Answer
The best vibe coding prompts do not simply tell an AI to build an app. They define the product goal, target user, core workflow, MVP scope, technical environment, constraints, development milestones, acceptance criteria, and verification process.
For complex projects, divide the work into separate stages:
- Clarify the product idea.
- Define the target user and problem.
- Separate MVP features from future ideas.
- Map the primary user workflow.
- Plan the architecture.
- Divide development into milestones.
- Implement one milestone at a time.
- Refine the result with focused feedback.
- Review incomplete or risky functionality.
- Prepare the application for launch.
This approach preserves the speed of vibe coding while reducing unnecessary assumptions and uncontrolled changes.
Key Takeaways
- Vibe coding focuses on product outcomes rather than individual code snippets.
- A strong prompt explains the user, problem, workflow, requirements, and definition of done.
- Large applications should be built through smaller, independently verifiable milestones.
- The AI should inspect an existing project before making broad changes.
- MVP features and non-goals should be defined before implementation begins.
- Feedback should explain what is wrong, what should change, and what must remain unchanged.
- A working demo is not automatically a production-ready application.
- Projects created across multiple AI sessions should be audited before additional features are added.
- Authentication, payments, permissions, and private data require additional human review.
Table of Contents
- What Is Vibe Coding?
- Vibe Coding vs AI-Assisted Coding
- How Vibe Coding Prompts Work
- Vibe Coding Prompt Structure
- Phase 1: Turn an Idea Into a Product Plan
- Phase 2: Define the MVP and Non-Goals
- Phase 3: Define the User Workflow
- Phase 4: Plan the Application Architecture
- Phase 5: Create a Development Plan
- Phase 6: Build One Milestone at a Time
- Phase 7: Add Features Without Breaking the App
- Phase 8: Refine the App Through Feedback
- Phase 9: Review and Verify the Application
- Phase 10: Prepare the App for Production
- Continue an AI-Generated Project
- Vibe Coding for Non-Developers
- Weak vs. Strong Vibe Coding Prompts
- Complete Vibe Coding Workflow
- Common Vibe Coding Mistakes
- Using PrompTessor for Vibe Coding
- Vibe Coding Prompt Checklist
- FAQ
What Is Vibe Coding?
Vibe coding is a conversational approach to software development in which a person describes the desired product or behavior in natural language and allows an AI coding tool to handle much of the implementation.
Instead of manually writing every component, route, function, query, and configuration file, the user guides the project through instructions such as:
- Turn this idea into a simple MVP.
- Create the first version of the onboarding flow.
- Add team collaboration to the current application.
- Make the dashboard easier to understand.
- Inspect the project and identify what is missing before launch.
The AI coding agent may inspect the repository, create files, modify existing code, install dependencies, run commands, generate tests, and explain its work.
This makes software creation more accessible to solo founders, designers, product managers, students, marketers, and developers who want to move from an idea to a working product more quickly.
However, vibe coding does not eliminate the need for product decisions or technical judgment.
The AI still needs someone to decide:
- Who the application is for.
- Which problem it should solve.
- Which features belong in the first version.
- Which tradeoffs are acceptable.
- What the agent may change.
- How the result should be evaluated.
- Whether the application is safe to launch.
The more important the application becomes, the more structured the vibe coding process should be.
Vibe Coding vs AI-Assisted Coding
Vibe coding and AI-assisted coding overlap, but their typical scopes are different.
Traditional AI-assisted coding often begins with a specific technical task:
- Write a function.
- Explain this error.
- Create unit tests.
- Review this API route.
- Refactor this component.
Vibe coding usually begins with a broader product outcome:
- Turn this idea into an MVP.
- Plan and build the primary user workflow.
- Add a subscription system to the existing product.
- Continue this application from its current state.
- Review the entire project before launch.
A useful distinction is:
- AI coding prompts guide individual software development tasks.
- Vibe coding prompts guide the broader process of creating and evolving an application.
For task-specific templates covering debugging, testing, code review, APIs, databases, performance, and security, see the complete guide to AI coding prompts for software development.
How Vibe Coding Prompts Work
A strong vibe coding workflow is rarely based on one perfect prompt.
It uses a sequence of prompts that gradually reduces uncertainty.
1. Explore
Explain the idea and ask the AI to identify the user, problem, workflow, and unanswered questions.
2. Scope
Separate essential MVP functionality from optional features and future ideas.
3. Design
Define the primary user journey, screens, actions, navigation, states, and permissions.
4. Plan
Choose an appropriate architecture and divide development into smaller milestones.
5. Build
Implement one milestone at a time instead of generating the entire application in one step.
6. Refine
Review the actual result and provide focused feedback about what should change.
7. Verify
Inspect functionality, permissions, validation, incomplete workflows, errors, and test results.
8. Launch
Review configuration, environment variables, migrations, monitoring, backups, deployment, and rollback requirements.
Each prompt should move the project closer to a clearly defined outcome.
Vibe Coding Prompt Structure
The amount of detail required depends on the complexity of the task. However, most effective vibe coding prompts include several of the following components.
1. Goal or Build Request
Explain what should be created or changed.
Goal:
Build the first version of a client portal where freelance designers can share project files, collect feedback, and track approval status.
2. Product and User Context
Describe the product, target user, problem, and intended outcome.
Target users:
Freelance designers working with small business clients.

User outcome:
Clients should be able to review deliverables and approve or request changes without using email threads.
3. Technical Environment
Include the programming language, framework, database, services, hosting environment, and testing tools.
Technical environment:
- Next.js with TypeScript
- PostgreSQL
- Prisma
- Tailwind CSS
- Vitest
- Playwright
- Deployed on Vercel
4. Existing Project Context
Explain whether the agent is creating a new project or modifying an existing one.
Existing project:
This is an existing application. Inspect the current repository before proposing changes. Reuse the existing authentication flow, dashboard layout, validation utilities, and UI components.
5. Current Behavior
For existing projects, describe what currently happens.
Current behavior:
Users can create projects, but there is no way to upload deliverables or collect client approval.
6. Expected Behavior
Describe what users should be able to accomplish after the work is complete.
Expected behavior:
A designer can upload a deliverable, send a review link, and receive either approval or a change request from the client.
7. Requirements
List the behaviors that must be implemented.
Requirements:
- Designers can upload project files.
- Clients can preview or download the files.
- Clients can approve or request changes.
- Designers can see the current review status.
- Both sides receive a clear confirmation after an action.
8. Constraints and Non-Goals
Tell the agent what it should preserve, avoid, or leave outside the current scope.
Constraints:
- Do not replace the existing authentication provider.
- Do not redesign unrelated dashboard pages.
- Do not add real-time chat.
- Do not introduce a new component library.
- Preserve the current project URL structure.
9. Acceptance Criteria
Define the observable conditions that indicate the work is complete.
Acceptance criteria:
- An authenticated designer can upload a supported file.
- A valid review link can be opened by the intended client.
- The client can approve or request changes.
- The updated status appears in the designer dashboard.
- Unauthorized users cannot access another project.
- Existing project workflows continue to work.
10. Output Format
Explain how the coding agent should present its plan and final result.
Before implementation:
- Summarize your understanding.
- List relevant files.
- Identify open questions.
- Propose a milestone-based plan.

After implementation:
- Summarize the changes.
- List modified files.
- Report tests and checks performed.
- Explain remaining limitations.
11. Testing and Verification
Specify which checks must be performed.
Verification:
- Run relevant tests.
- Add coverage for authorization and status changes.
- Run type checking.
- Run linting.
- Run the production build.
- Report any check that could not be completed.
12. Questions and Assumptions
Ask the agent to identify important decisions that cannot safely be inferred.
Before making major changes, list:
- Blocking questions
- Product assumptions
- Technical assumptions
- Risks that require confirmation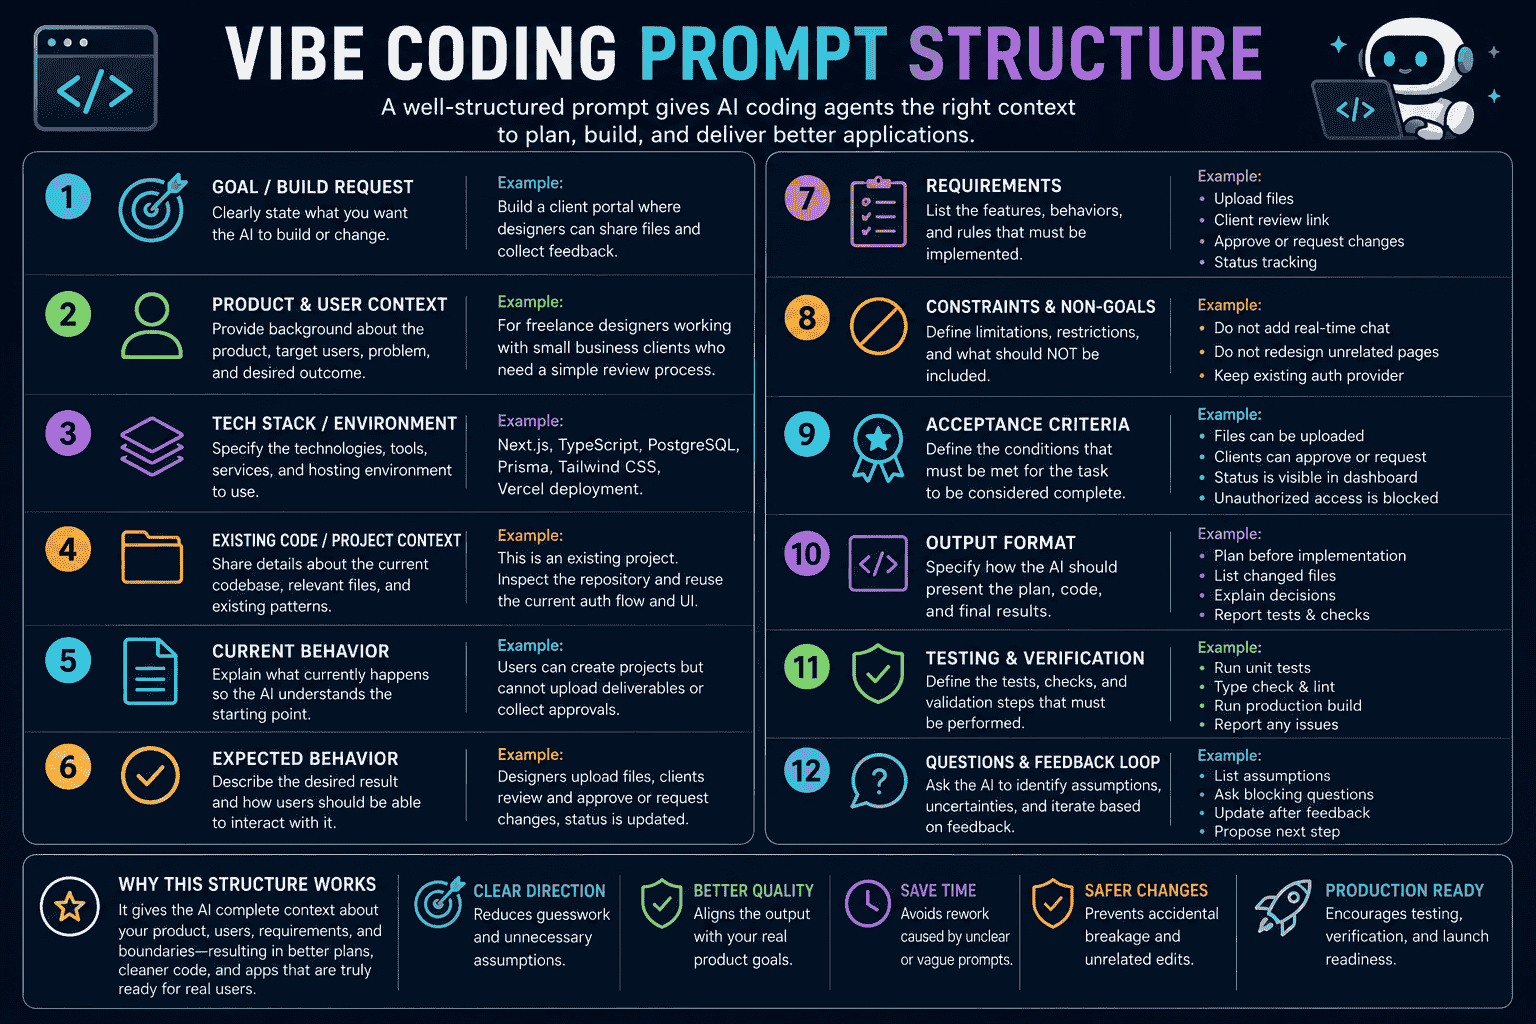
Phase 1: Turn an Idea Into a Product Plan
Many vibe coding projects begin with a rough idea rather than a complete product specification.
Before generating code, use the AI to clarify the problem, target user, value proposition, and primary workflow.
Prompt 1: App Idea to Product Brief
You are helping me turn an application idea into a clear product brief.

Application idea:
[DESCRIBE THE IDEA]

What inspired the idea:
[OPTIONAL CONTEXT]

Potential target users:
[DESCRIBE THEM OR WRITE UNKNOWN]

Main problem:
[DESCRIBE THE PROBLEM OR WRITE UNKNOWN]

Desired outcome:
[WHAT USERS SHOULD BE ABLE TO ACCOMPLISH]

Do not generate implementation code yet.

First:

1. Restate the idea in clear product terms.
2. Identify the most likely primary user.
3. Define the specific problem being solved.
4. Describe the value proposition.
5. Map the simplest useful user workflow.
6. Identify existing assumptions.
7. Separate confirmed requirements from uncertain ideas.
8. Identify risks, dependencies, and unanswered questions.
9. Suggest how the product could be differentiated without adding unnecessary complexity.

Return:

- Product summary
- Target user
- User problem
- Value proposition
- Primary workflow
- Product assumptions
- Key risks
- Open questions
- Recommended next step
This prompt helps prevent the AI from treating a vague idea as a complete specification.
Phase 2: Define the MVP and Non-Goals
One of the most common vibe coding mistakes is trying to build every possible feature in the first version.
A clear MVP scope helps the AI prioritize the smallest product that delivers the main user outcome.
Prompt 2: MVP Scope Prompt
Help me define the first MVP for this application.

Product:
[PRODUCT SUMMARY]

Target user:
[TARGET USER]

Primary problem:
[PROBLEM]

Primary workflow:
[CORE USER WORKFLOW]

Possible features:
[LIST ALL CURRENT FEATURE IDEAS]

Constraints:
[BUDGET, TIME, TECHNICAL, PLATFORM, OR TEAM CONSTRAINTS]

Evaluate every proposed feature based on whether it is necessary for the primary user to reach the main outcome.

Divide the features into:

1. Essential MVP features
2. Useful but optional features
3. Future features
4. Features that should not be built
5. Features that require more validation

For the MVP:

- Keep the scope as small as practical.
- Avoid features that only make the product appear more complete.
- Avoid multiple user roles unless they are required.
- Avoid premature automation.
- Avoid infrastructure that is not needed for the first release.
- Identify any feature that creates significant security or operational risk.

Return:

- MVP objective
- Essential features
- Optional features
- Non-goals
- Primary success criteria
- Key assumptions
- Recommended first release
- What should be validated before expanding
Non-goals are especially important because they tell the coding agent what not to build.
Phase 3: Define the User Workflow
Features should support a clear user journey.
Before planning the interface or architecture, define the actions users need to complete from beginning to end.
Prompt 3: User Flow and Screen Planning Prompt
Design the primary user workflow for this application.

Product:
[PRODUCT SUMMARY]

Target user:
[TARGET USER]

Primary outcome:
[WHAT THE USER SHOULD ACCOMPLISH]

MVP features:
[LIST MVP FEATURES]

Known constraints:
[LIST CONSTRAINTS]

Create the simplest workflow that allows the user to reach the primary outcome.

For each step, describe:

- User goal
- User action
- Screen or interface
- Required information
- System response
- Success state
- Empty state
- Error state
- Permission requirement
- Next action

Also identify:

1. The minimum number of screens required
2. Which steps can be combined
3. Where users may become confused
4. Where confirmation is required
5. Which actions are reversible
6. Which actions may require additional security
7. Which steps should not be included in the MVP

Return:

- Primary user journey
- Screen list
- Navigation structure
- Actions per screen
- Required states
- Permission boundaries
- Potential friction
- Open product decisions

Do not generate interface code yet.
This separates product flow decisions from visual implementation decisions.
Phase 4: Plan the Application Architecture
Once the product and workflow are clear, the AI can recommend an architecture that supports the current requirements without overengineering the project.
Prompt 4: Application Architecture Planning Prompt
Plan a maintainable architecture for the following application.

Product:
[PRODUCT SUMMARY]

Primary users:
[TARGET USERS]

Core workflow:
[PRIMARY WORKFLOW]

MVP features:
[LIST FEATURES]

Expected scale:
[EXPECTED USERS, REQUESTS, DATA, OR UNKNOWN]

Technical preferences:
[FRAMEWORK, LANGUAGE, DATABASE, HOSTING, OR OPEN TO RECOMMENDATIONS]

Required integrations:
[AUTHENTICATION, PAYMENTS, STORAGE, EMAIL, AI API, ANALYTICS, ETC.]

Constraints:
[LIST CONSTRAINTS]

Requirements:

- Prefer the simplest architecture that supports the MVP.
- Avoid premature microservices.
- Avoid unnecessary abstractions.
- Separate product logic from presentation and infrastructure.
- Define clear ownership for modules and data.
- Include authentication and authorization boundaries.
- Include input validation and error handling.
- Consider deployment and operational simplicity.
- Explain important tradeoffs.
- Identify choices that may be difficult to change later.

Return:

1. Recommended stack
2. Architecture overview
3. Main application modules
4. Suggested folder structure
5. Core data entities and relationships
6. API or server boundaries
7. Authentication and authorization approach
8. External integrations
9. Testing strategy
10. Deployment approach
11. Major tradeoffs
12. Technical risks
13. Decisions that require confirmation

Do not generate the full application yet.
The instruction not to generate the full application yet gives you an opportunity to review the architecture before implementation begins.
Phase 5: Create a Milestone-Based Development Plan
A large feature becomes easier to review when it is divided into smaller milestones.
Each milestone should produce a result that can be evaluated independently.
Prompt 5: Development Milestone Prompt
Turn the approved product scope and architecture into a milestone-based development plan.

Product:
[PRODUCT SUMMARY]

MVP scope:
[LIST FEATURES]

Architecture:
[PASTE OR SUMMARIZE THE APPROVED ARCHITECTURE]

Technical environment:
[STACK]

Constraints:
[LIST CONSTRAINTS]

Create a sequence of small development milestones.

Each milestone must include:

- Objective
- User-visible outcome
- Included work
- Excluded work
- Relevant modules or files
- Dependencies
- Data or migration requirements
- Acceptance criteria
- Tests and validation
- Risks
- Completion evidence

Rules:

- Each milestone should be independently reviewable.
- Build the primary user workflow before secondary features.
- Do not combine unrelated features.
- Do not hide unfinished work behind a completed interface.
- Identify milestones that require manual approval.
- Include a final verification and launch-preparation milestone.

Return:

1. Recommended milestone order
2. Milestone details
3. Dependencies between milestones
4. Decisions required before implementation
5. Suggested first milestone
A possible sequence might be:
- Project foundation
- Authentication
- Core data model
- Primary user workflow
- Interface states and validation
- Verification
- Deployment preparation
Phase 6: Build the App One Milestone at a Time
After approving the plan, ask the coding agent to implement only the next milestone.
This makes changes easier to inspect and reduces the risk of unrelated modifications.
Prompt 6: Implement the Next Milestone
Implement the next approved milestone in this application.

Product:
[PRODUCT SUMMARY]

Current milestone:
[MILESTONE NAME]

Milestone objective:
[OBJECTIVE]

User-visible outcome:
[EXPECTED RESULT]

Technical environment:
[STACK]

Existing project:
[DESCRIBE THE CURRENT STATE]

Relevant files:
[LIST FILES OR ASK THE AGENT TO LOCATE THEM]

Requirements:
[LIST REQUIREMENTS]

Constraints:
[LIST CONSTRAINTS]

Acceptance criteria:
[LIST ACCEPTANCE CRITERIA]

Required verification:
[TESTS, TYPE CHECKING, LINTING, BUILD, MANUAL CHECKS]

Follow this process:

Phase 1: Inspect

- Inspect the relevant code before editing.
- Explain how the current implementation works.
- Identify the files that need to change.
- Identify missing requirements, conflicts, and assumptions.

Phase 2: Plan

- Propose the smallest maintainable implementation.
- Explain how it follows the existing architecture.
- Identify data, API, UI, and test changes.
- Do not include work from future milestones.

Phase 3: Implement

- Follow existing project conventions.
- Reuse existing components and utilities.
- Avoid unrelated refactoring.
- Do not silently change public behavior.
- Include loading, empty, success, and error states when relevant.
- Add appropriate validation and authorization.
- Add or update relevant tests.

Phase 4: Verify

- Run the required tests and checks.
- Confirm each acceptance criterion.
- Review the final changes for accidental modifications.
- Do not claim a check passed if it was not performed.

After implementation, provide:

- Summary of changes
- Modified files
- Important decisions
- Tests and checks performed
- Acceptance criteria results
- Assumptions
- Known limitations
- Recommended next milestone
Phase 7: Add Features Without Breaking Existing Work
As the application grows, new features need to fit the existing architecture and preserve working behavior.
The coding agent should inspect the current project rather than treating every request as a new application.
Prompt 7: Add a Feature to an Existing App
Add the following feature to an existing application.

Feature:
[DESCRIBE THE FEATURE]

User value:
[WHY USERS NEED IT]

Current user workflow:
[DESCRIBE THE CURRENT WORKFLOW]

Expected workflow:
[DESCRIBE THE NEW WORKFLOW]

Technical environment:
[STACK]

Known relevant files:
[FILES OR DIRECTORIES]

Existing behavior that must remain unchanged:
[LIST BEHAVIOR]

Feature requirements:
[LIST REQUIREMENTS]

Non-goals:
[LIST WHAT IS OUT OF SCOPE]

Acceptance criteria:
[LIST ACCEPTANCE CRITERIA]

Before editing:

1. Inspect the current implementation.
2. Identify existing patterns that should be reused.
3. Explain which modules, routes, components, and data models are affected.
4. Identify possible side effects.
5. Identify backward-compatibility concerns.
6. Propose the smallest maintainable change.
7. Ask questions when an important product decision cannot be inferred.

During implementation:

- Do not rewrite unrelated modules.
- Do not replace existing dependencies without approval.
- Preserve current API behavior unless a change is required.
- Preserve existing analytics and permission behavior.
- Add or update relevant tests.
- Handle migration requirements safely.

After implementation:

- Summarize the user-visible change.
- List modified files.
- Explain how existing behavior was preserved.
- Report tests and checks performed.
- Identify possible regressions or follow-up work.
Phase 8: Refine the App Through Feedback
Iteration is a central part of vibe coding.
However, feedback such as “make it better” or “make it more modern” does not give the AI enough direction.
Strong feedback explains the observed problem, desired change, and elements that must remain unchanged.
Prompt 8: Iteration and Feedback Prompt
Refine the current implementation based on the following feedback.

Product:
[PRODUCT SUMMARY]

Screen or workflow:
[DESCRIBE THE AREA]

Current result:
[DESCRIBE WHAT CURRENTLY EXISTS]

What works:
[LIST WHAT SHOULD BE PRESERVED]

Current problem:
[EXPLAIN WHAT FEELS WRONG OR DOES NOT WORK]

Desired change:
[DESCRIBE THE EXPECTED IMPROVEMENT]

Evidence:
[SCREENSHOT, USER FEEDBACK, ERROR, METRIC, OR OBSERVATION]

Must remain unchanged:
[LIST FUNCTIONALITY, DATA, COMPONENTS, OR BEHAVIOR]

Constraints:
[LIST CONSTRAINTS]

Acceptance criteria:
[DEFINE HOW THE IMPROVEMENT WILL BE EVALUATED]

Before editing:

1. Restate the feedback in specific terms.
2. Identify the likely cause of the problem.
3. Identify the smallest useful change.
4. Explain possible side effects.
5. Ask questions if the desired result is subjective or unclear.

After editing:

- Summarize what changed.
- Explain how the feedback was addressed.
- List what was intentionally preserved.
- Report validation performed.
- Identify any remaining uncertainty.
For example, replace:
Make the dashboard better.with:
The dashboard hierarchy feels too flat.

Keep the existing data and functionality, but make the primary metric more prominent, reduce the visual weight of secondary cards, improve spacing between sections, and preserve the current mobile layout.

Do not change the navigation, filters, or analytics events.
Phase 9: Review and Verify the Application
Before continuing development or preparing for launch, review the application as a complete product rather than checking only whether it builds successfully.
Prompt 9: App Verification and Gap Analysis
Review this application and identify gaps between the intended product and the current implementation.

Product goal:
[PRODUCT GOAL]

Target user:
[TARGET USER]

Expected primary workflow:
[WORKFLOW]

MVP requirements:
[LIST REQUIREMENTS]

Technical environment:
[STACK]

Do not modify files during the first review.

Inspect the project for:

1. Missing MVP functionality
2. Incomplete user workflows
3. Placeholder or mock production data
4. Buttons or forms without working actions
5. Broken navigation
6. Missing loading, empty, success, and error states
7. Missing validation
8. Authentication and authorization gaps
9. Cross-user or cross-workspace data access
10. Inconsistent data handling
11. Ignored errors or disabled checks
12. Missing configuration
13. Failing tests
14. Type errors
15. Build failures
16. Unnecessary or duplicated implementation
17. Features that appear complete but are not connected
18. Requirements that cannot be verified

Classify findings as:

- Blocker
- High priority
- Medium priority
- Low priority

For every finding, provide:

- Evidence
- User impact
- Technical impact
- Recommended correction
- Verification method

Finish with:

- Current completion summary
- Blocking issues
- Missing MVP requirements
- Recommended repair order
- Checks that were performed
- Checks that could not be performed
- Areas requiring human review
For deeper templates covering debugging, testing, security reviews, performance optimization, and code review, use the dedicated AI coding prompts guide.
Phase 10: Prepare the App for Production
A working local application may still be missing the configuration, monitoring, security controls, and recovery procedures required for real users.
Prompt 10: Production Readiness Prompt
Review and prepare this application for production deployment.

Product:
[PRODUCT SUMMARY]

Expected users:
[USER TYPE AND EXPECTED SCALE]

Technical environment:
[STACK]

Deployment target:
[PLATFORM]

External services:
[DATABASE, AUTHENTICATION, PAYMENTS, EMAIL, STORAGE, AI API, ANALYTICS, ETC.]

Review:

1. Environment variables
2. Public configuration versus secrets
3. Authentication
4. Resource-level authorization
5. Input validation
6. Database migrations
7. Existing data compatibility
8. Error handling
9. Logging
10. Monitoring and alerts
11. Rate limits and abuse protection
12. File and storage configuration
13. External callback URLs
14. Webhooks
15. Email configuration
16. Payment configuration
17. Build and start commands
18. Test results
19. Backup requirements
20. Rollback requirements
21. Privacy-sensitive data
22. Legal or compliance dependencies
23. Post-deployment verification

Do not execute irreversible production changes without approval.

Classify every finding as:

- Launch blocker
- High priority
- Medium priority
- Optional improvement

Return:

- Production readiness verdict
- Launch blockers
- Required configuration
- Required environment variables
- Migration plan
- Deployment checklist
- Rollback plan
- Post-deployment checks
- Known risks
- Items requiring specialist review
How to Continue an AI-Generated Project
A project created through several AI coding sessions may contain conflicting patterns, duplicated logic, temporary workarounds, and incomplete features.
Before adding more functionality, ask the agent to establish the current state of the codebase.
Prompt 11: Existing AI-Generated Codebase Audit
I need to continue an application that has already been modified through multiple AI coding sessions.

Do not assume that the current implementation is complete, correct, or consistent.

Product goal:
[DESCRIBE THE PRODUCT]

Intended users:
[TARGET USERS]

Expected core workflow:
[WORKFLOW]

Current known functionality:
[DESCRIBE WHAT APPEARS TO WORK]

Next planned feature:
[DESCRIBE THE FEATURE]

Before modifying files:

1. Inspect the repository structure.
2. Read available documentation and project instructions.
3. Identify the current architecture.
4. Identify the main routes, modules, services, and data models.
5. Identify duplicated or conflicting implementations.
6. Find unfinished routes and components.
7. Find placeholder or hardcoded production data.
8. Find ignored errors, disabled validation, and weakened types.
9. Find temporary workarounds and commented-out functionality.
10. Identify inconsistent naming and architectural patterns.
11. Inspect authentication and authorization boundaries.
12. Run existing tests, type checking, linting, and build when available.
13. Compare the current implementation with the intended product workflow.

Return:

- Architecture summary
- Current working functionality
- Incomplete functionality
- Suspicious or conflicting areas
- Validation results
- Security-sensitive concerns
- Recommended cleanup
- Recommended order of repairs
- Proposed plan for the next feature
- Questions requiring clarification

Wait for approval before broad cleanup, dependency replacement, database restructuring, or architectural changes.
Vibe Coding for Non-Developers
Vibe coding allows people without a traditional programming background to prototype product ideas and build useful internal tools or early-stage applications.
However, a polished interface does not prove that the implementation is safe or complete.
Non-developers should be especially cautious when an application includes:
- Authentication
- Payments and subscriptions
- Private user data
- File uploads
- Admin permissions
- API credentials
- Healthcare, legal, or financial information
- Actions that cannot easily be reversed
Prompt 12: Explain the App to a Non-Technical Founder
Explain the current implementation to a non-technical product owner.

Product:
[PRODUCT SUMMARY]

Feature or workflow:
[DESCRIBE THE AREA]

Explain in plain language:

1. What the feature does
2. What happens when a user performs the main action
3. What data is collected
4. Where the data is stored
5. Who can access the data
6. How permissions are enforced
7. Which external services are involved
8. What could fail
9. What happens when something fails
10. What has been tested
11. What has not been tested
12. What assumptions were made
13. Which risks remain
14. What requires an experienced developer or security specialist to review
15. Whether this feature appears ready for real users

Do not hide uncertainty behind technical terminology.

Separate:

- Confirmed behavior
- Assumed behavior
- Unverified behavior
- Recommended expert review
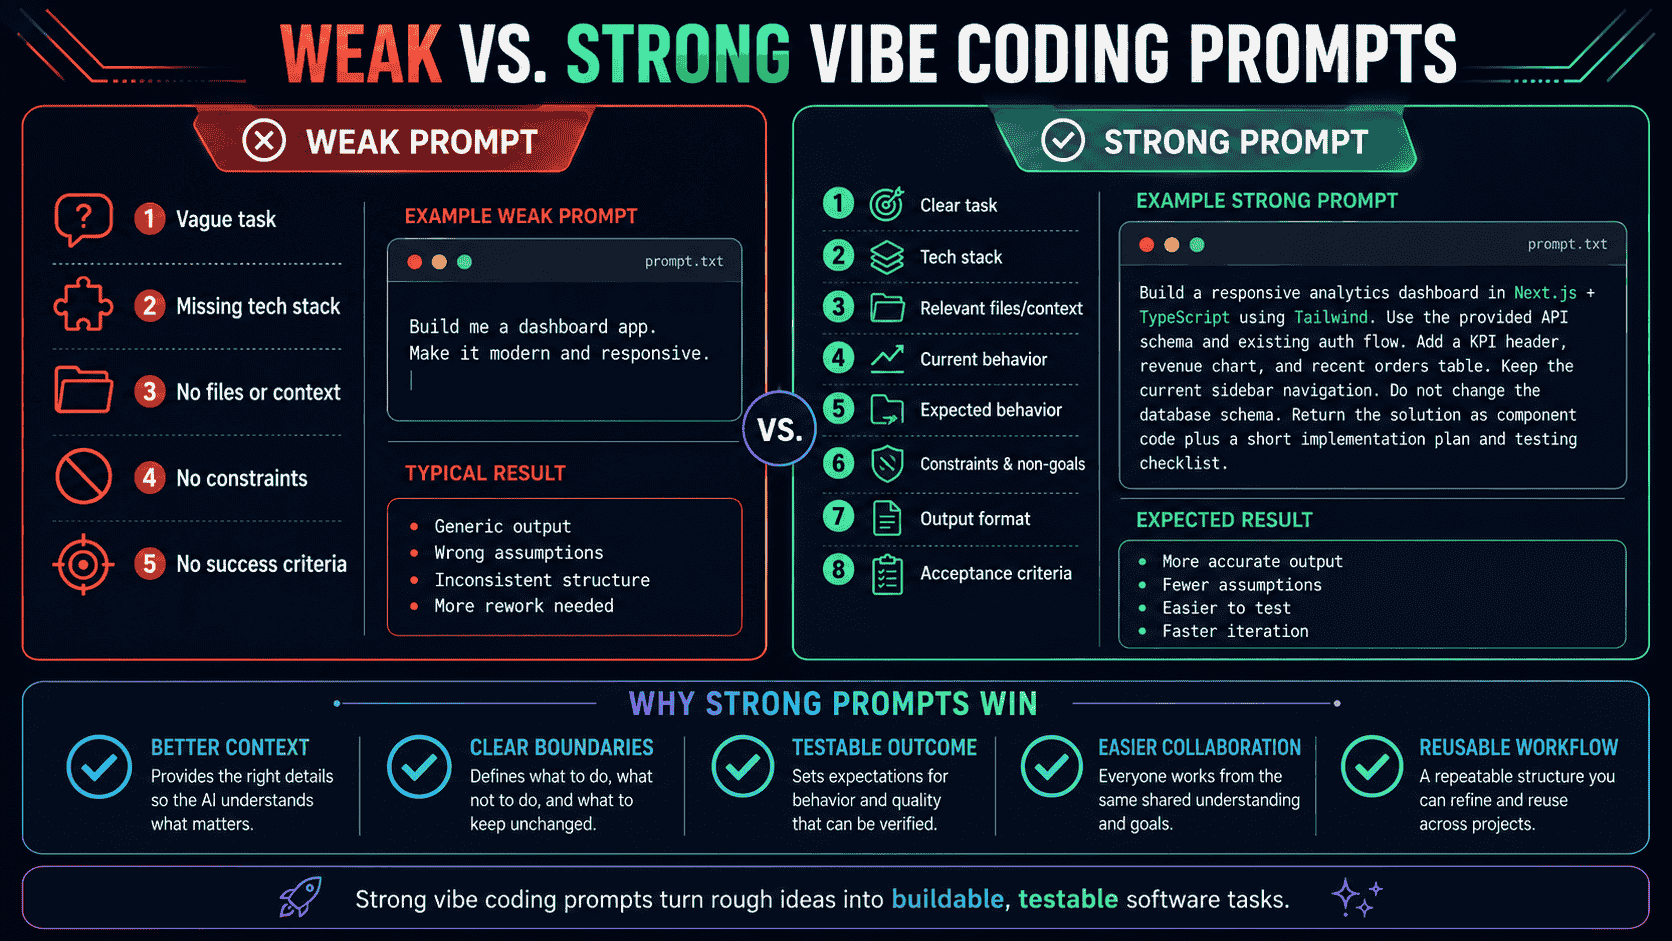
Weak vs. Strong Vibe Coding Prompts
Weak Prompt
Build a SaaS app for managing projects.This prompt does not explain:
- Who will use the product.
- Which project-management problem it solves.
- What the primary user workflow should be.
- Which features belong in the MVP.
- Which features should remain outside the scope.
- Which technical environment should be used.
- How permissions should work.
- What conditions define completion.
- How the application should be verified.
Strong Prompt
Build the first MVP of a lightweight project management application for small remote creative teams.

Target user:
Teams with 3 to 15 members that find enterprise project management tools too complex.

Primary problem:
Team members need one simple place to assign tasks, track deadlines, and communicate project status.

Primary workflow:
1. A user creates an account.
2. The user creates a workspace.
3. The user creates a project.
4. The user invites team members.
5. Members create and assign tasks.
6. Members update task status.
7. The dashboard shows project progress.

MVP features:
- Email authentication
- One workspace per account
- Project creation
- Member invitations
- Task creation and assignment
- Task status updates
- Project dashboard
- Loading, empty, success, and error states

Non-goals:
- Time tracking
- Billing
- File storage
- Real-time chat
- Mobile applications
- Advanced reporting
- Multiple workspace roles

Technical environment:
- Next.js with TypeScript
- PostgreSQL
- Prisma
- Tailwind CSS
- Vitest
- Playwright
- Vercel

Requirements:
- Use server-side authorization for workspace and project access.
- Reuse existing components when available.
- Validate all user input.
- Do not use placeholder production data.
- Keep the architecture suitable for a small MVP.
- Do not add dependencies without explaining why.

Acceptance criteria:
- A new user can complete the primary workflow.
- Invited members can access only the correct workspace.
- Unauthorized users cannot access another project.
- Invalid input displays a useful message.
- The dashboard reflects task status changes.
- Relevant tests, type checking, linting, and build validation pass.

Process:
1. Clarify missing requirements.
2. Propose an architecture.
3. Divide the project into milestones.
4. Wait for approval before implementing major architectural decisions.
5. Implement one milestone at a time.
6. Verify each milestone before continuing.

After every milestone, report:
- Completed functionality
- Modified files
- Validation performed
- Known limitations
- Recommended next step
The strong version does not attempt to control every line of code. It defines the product boundaries and gives the AI enough information to make decisions that support the intended application.
Complete Vibe Coding Workflow
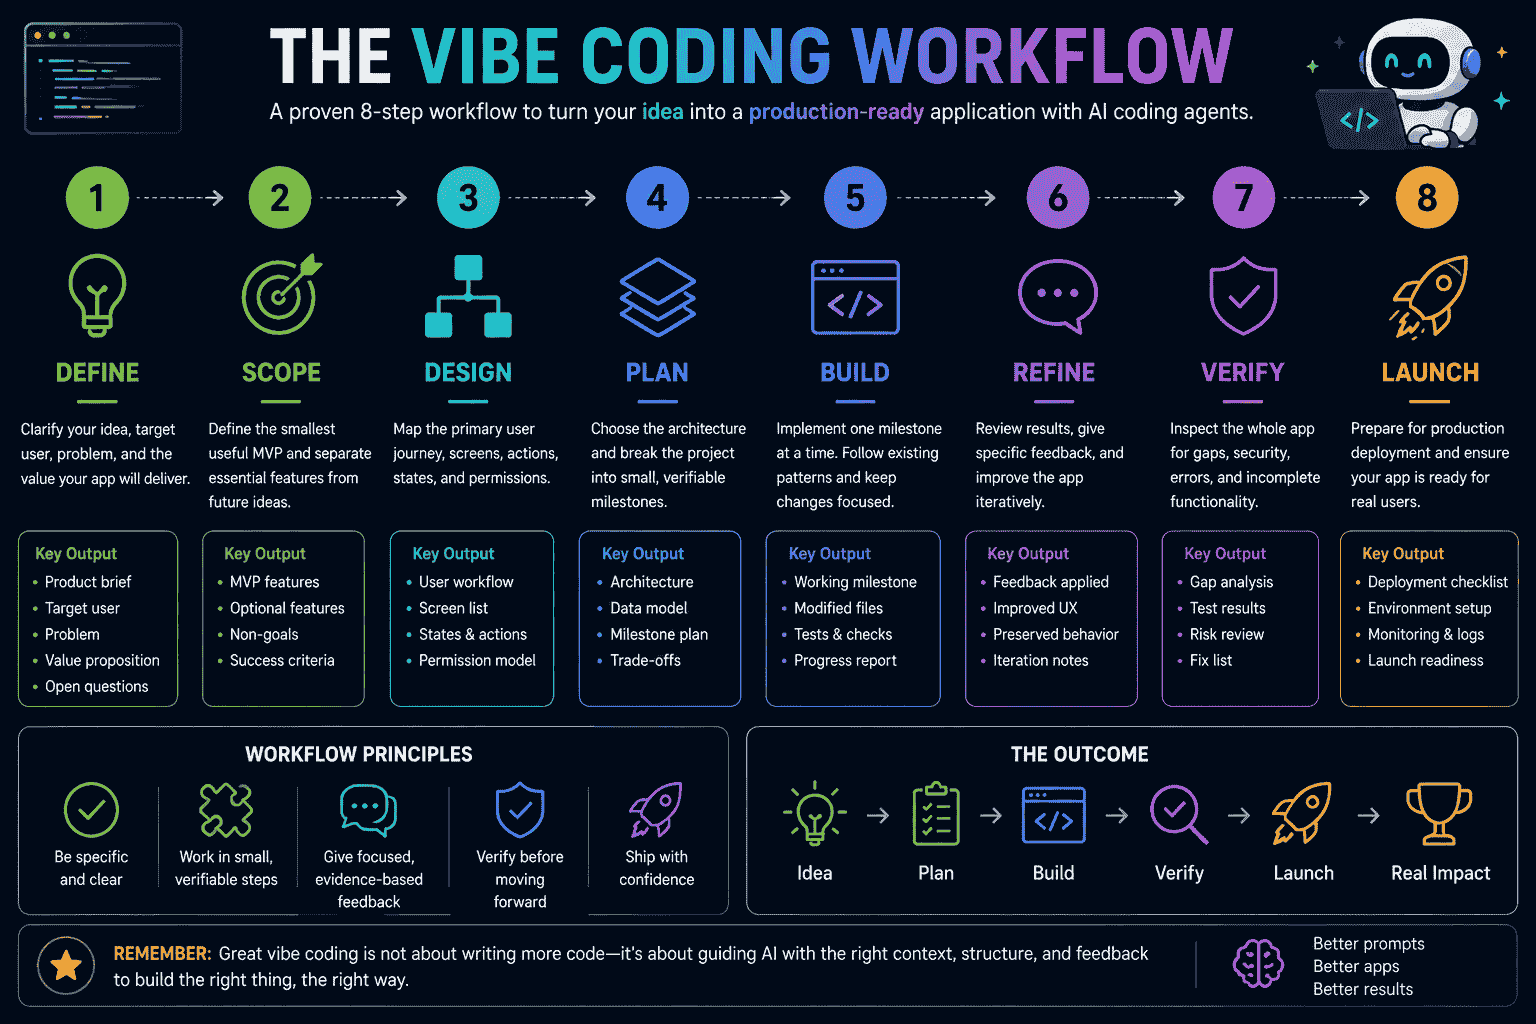
The complete vibe coding process can be summarized in eight stages.
1. Define
Clarify the product idea, target user, problem, value proposition, and desired outcome.
2. Scope
Choose the smallest useful MVP and define explicit non-goals.
3. Design
Map the primary user journey, screens, actions, states, and permissions.
4. Plan
Select an appropriate architecture and divide development into independently verifiable milestones.
5. Build
Implement one milestone at a time while following the existing project conventions.
6. Refine
Review the actual result and provide specific, evidence-based feedback.
7. Verify
Identify incomplete workflows, authorization problems, validation gaps, placeholder functionality, and failed checks.
8. Launch
Review configuration, migrations, secrets, monitoring, backups, deployment, rollback, and post-launch validation.
Prompt 13: Complete Vibe Coding Master Prompt
You are acting as a careful product engineer helping me turn an application idea into a working product.

Product idea:
[DESCRIBE THE IDEA]

Target user:
[DESCRIBE THE USER]

Problem:
[DESCRIBE THE PROBLEM]

Desired user outcome:
[DESCRIBE THE OUTCOME]

Current project state:
[NEW PROJECT OR EXISTING PROJECT]

Technical preferences:
[STACK OR OPEN TO RECOMMENDATIONS]

Known requirements:
[LIST REQUIREMENTS]

Known constraints:
[LIST CONSTRAINTS]

Follow this workflow:

Phase 1: Define

- Restate the product idea.
- Identify the primary user.
- Clarify the problem and value proposition.
- Identify assumptions and unanswered questions.
- Do not generate implementation code yet.

Phase 2: Scope

- Define the smallest useful MVP.
- Separate essential, optional, and future features.
- Define explicit non-goals.
- Identify risky or expensive features.

Phase 3: Design

- Map the primary user workflow.
- Identify required screens and actions.
- Include loading, empty, success, and error states.
- Identify authentication and permission boundaries.

Phase 4: Plan

- Recommend the simplest maintainable architecture.
- Explain important tradeoffs.
- Define the data model and module boundaries.
- Divide development into small, verifiable milestones.
- Define acceptance criteria for every milestone.

Phase 5: Build

- Implement only the approved milestone.
- Inspect existing code before making changes.
- Follow project conventions.
- Reuse existing components and utilities.
- Avoid unrelated refactoring.
- Preserve existing behavior outside the scope.
- Add validation, authorization, and error handling.
- Add or update relevant tests.

Phase 6: Refine

- Compare the implementation with the approved requirements.
- Ask for focused feedback.
- Preserve functionality that already works.
- Make the smallest change that addresses the feedback.

Phase 7: Verify

- Confirm every acceptance criterion.
- Run relevant tests, type checking, linting, and build validation.
- Identify placeholder or incomplete functionality.
- Review permissions and data access.
- Report any check that could not be performed.

Phase 8: Launch

- Review environment variables and secrets.
- Review database migrations.
- Review deployment configuration.
- Review logging, monitoring, backups, and rollback.
- Identify launch blockers.
- Do not execute irreversible production operations without approval.

At every stage:

- Separate confirmed facts from assumptions.
- Ask questions when a decision cannot be inferred safely.
- Do not claim that work was completed or verified when it was not.
- Explain important risks in plain language.
- Wait for approval before major architectural, database, or dependency changes.

Final reporting format:

- Current phase
- Summary
- Decisions made
- Open questions
- Modified files
- Tests and checks
- Acceptance criteria results
- Known limitations
- Remaining risks
- Recommended next step
Common Vibe Coding Mistakes
Asking the AI to Build the Entire App at Once
A single large request gives the agent too much freedom and makes incorrect decisions difficult to isolate.
Better approach: Divide the product into small milestones with separate acceptance criteria.
Starting Implementation Before Clarifying the Product
The AI may build a technically functional application that does not solve a clear user problem.
Better approach: Define the user, problem, value proposition, and primary workflow before selecting features.
Failing to Define the MVP
Without a clear MVP, the agent may add unnecessary roles, dashboards, automation, integrations, and infrastructure.
Better approach: Separate essential features, future features, and explicit non-goals.
Giving Vague Feedback
Instructions such as “make it better” force the AI to guess what better means.
Better approach: Describe the current problem, desired change, evidence, acceptance criteria, and elements that must remain unchanged.
Allowing Unrelated Rewrites
The AI may replace dependencies, restructure folders, or rewrite components when a smaller change would be safer.
Better approach: Ask for the smallest maintainable change and explicitly preserve existing behavior.
Trusting a Working Demo Without Verification
An application can look complete while still containing placeholder data, missing permissions, disconnected buttons, or unhandled failures.
Better approach: Perform a gap analysis against the intended product workflow before launch.
Continuing a Messy AI-Generated Codebase Without an Audit
Adding features to an inconsistent project can multiply existing problems.
Better approach: Inspect the current architecture, incomplete functionality, duplicated logic, ignored errors, and validation results before continuing.
Using PrompTessor for Vibe Coding
Vibe coding prompts often begin as informal instructions:
Build an app where users can compare two landing pages and let AI recommend the better one.
This may communicate the general idea, but it does not yet define the target user, workflow, MVP scope, technical environment, constraints, acceptance criteria, or verification requirements.
PrompTessor can help transform rough app ideas and development instructions into clearer prompts for coding agents and AI assistants.
A practical workflow is:
- Start with the app idea or next development milestone.
- Use Prompt Generator to create a structured first version.
- Add the product goal, target user, workflow, and technical context.
- Define the MVP, requirements, constraints, and non-goals.
- Analyze the prompt for missing context or unclear instructions.
- Use the AI Prompt Optimizer to improve clarity, specificity, structure, constraints, and output expectations.
- Refine the prompt based on questions from the coding agent.
- Save reusable prompts for product planning, implementation, feedback, verification, and launch.
The goal is not to make every prompt unnecessarily long.
The goal is to include the information that changes how the application should be planned, built, and evaluated.
Vibe Coding Prompt Checklist
Before asking an AI coding agent to begin a major task, check whether the prompt explains:
- What product or feature is being created.
- Who will use it.
- Which problem it solves.
- What users should be able to accomplish.
- Which functionality belongs in the MVP.
- Which functionality is outside the scope.
- Which technical environment is being used.
- Whether the project is new or existing.
- Which existing patterns should be reused.
- Which behavior must remain unchanged.
- Which constraints apply.
- How permissions should work.
- What conditions define completion.
- Which tests and checks should run.
- How the AI should report its work.
If several of these details are missing, ask the agent to clarify and plan before allowing broad implementation changes.
FAQ About Vibe Coding Prompts
What is a vibe coding prompt?
A vibe coding prompt is a natural-language instruction used to guide an AI coding agent through planning, building, modifying, or reviewing an application. It usually describes a product outcome rather than only an isolated code task.
What makes a good vibe coding prompt?
A good vibe coding prompt explains the product goal, target user, primary workflow, MVP scope, technical environment, constraints, acceptance criteria, and verification requirements.
What is the difference between vibe coding and AI coding?
AI coding is a broad category covering the use of AI for software development. Vibe coding usually refers to a more conversational and outcome-driven workflow in which the user directs a larger part of the product-building process through natural-language instructions.
Can vibe coding build a complete app?
AI coding agents can help plan and implement substantial parts of an application. However, a complete product still requires product decisions, verification, security review, deployment preparation, and ongoing maintenance.
Should I ask the AI to plan before coding?
For complex tasks, yes. Planning helps expose missing requirements, incorrect assumptions, unnecessary scope, architectural risks, and conflicting changes before implementation begins.
How should I divide a vibe coding project into milestones?
Each milestone should produce one independently verifiable outcome. A typical sequence includes project foundation, authentication, core data model, primary user workflow, interface states, verification, and deployment preparation.
Can non-developers use vibe coding?
Yes. Non-developers can use vibe coding to prototype ideas and build early applications. However, features involving payments, private data, permissions, authentication, or regulated information should receive experienced technical review.
Can vibe coding be used for production applications?
Vibe coding can contribute to production software, but generated code should not be trusted only because it compiles or appears to work. The application still needs careful validation of permissions, data integrity, failure handling, security, deployment, monitoring, and recovery.
Conclusion
Vibe coding can dramatically reduce the distance between an idea and a working application.
But the best results do not come from repeatedly asking an AI to build more features.
They come from guiding the project through a clear workflow:
- Define the product and user.
- Choose the smallest useful MVP.
- Map the primary workflow.
- Plan the architecture.
- Divide development into milestones.
- Build one milestone at a time.
- Refine the result with focused feedback.
- Verify the complete application.
- Prepare configuration, operations, and deployment.
A strong vibe coding prompt does not need to control every implementation detail.
It needs to give the AI enough product context, technical boundaries, and completion criteria to make useful decisions without unnecessary guessing.
That is how vibe coding becomes more than fast code generation.
It becomes a structured process for turning ideas into applications that can continue to improve after the first prompt.
Build better prompts in one workspace
Generate prompts from ideas, analyze and optimize quality, refine with feedback, reverse-engineer content, and save reusable prompts in your Prompt Library.
Try PrompTessor Free